Moving IMAP mailboxes to mailcow with NFS and daily backups
Overview
I’ve been hosting my mail for the past few years with a pretty traditional setup:
- Postfix: Sending mail (SMTP)
- Dovecot: Login and receiving mail (IMAP)
- MySQL: Database
- Rspamd: Spam filtering
- Redis: In memory cache
Even this build was pretty sufficient for a personal mail server, it did come with a few caveats:
- Not easy to amend user details, add new users, domains, etc
- Not easy to migrate, ex. need to spin a whole new server and configure all the services, etc
- Not easy to make the setup fault tolerant and highly available
I did have an idea to containerize my original setup and while doing the initial research I stumbled upon mailcow. I had heard of mailcow in the past but never really look into it too much as I was pretty happy with my existing build.
Mailcow is essentially Postfix, Dovecot, Mysql, Redis, Rspamd and a bunch of other services that are optional like Webmin/SoGO and ClamV, which are all build into docker containers Docker compose is used to pull and start these containers and the configuration of the mail server is then done through the Web UI.
Our setup will also include an NFS export which will be mounted on the VM running the mailcow containers. We will use a daily cron job to kick off a script that will backup all of our data (vmail, redis, postfix, dovecot, mysql) onto the NFS.
Prerequisites
If you want to try something outside of this setup, make changes to it or you find my instructions unclear, make sure to have a look at the mailcow documentation.
DNS
In this tutorial I will be using 96-fromsofia.net as the domain name, change this with your own one. Make sure the following DNS records have been configured:
DOMAIN                              TYPE    VALUE
---------------------------------------------------------------------------
mx.96-fromsofia.net.                A       99.80.155.226
autoconfig.96-fromsofia.net.        CNAME   mx.96-fromsofia.net.
autodiscover.96-fromsofia.net.      CNAME   mx.96-fromsofia.net.
96-fromsofia.net.           MX      0 mx.96-fromsofia.net.
96-fromsofia.net.           TXT     "v=spf1 a:mx.96-fromsofia.net ?all"
_dmarc.96-fromsofia.net.    TXT     "v=DMARC1; p=reject;"
---------------------------------------------------------------------------
Note we will also need to configure a DKIM record. If you have an existing DKIM key you want to import into mailcow, you can configure your record now. Mailcow will generate a DKIM key and record for us when we add our domain so I will be adding the DKIM record later.
NFS
As explained earlier this setup will use an NFS export as backup storage. If you don’t want to use NFS and are prefer using the VMs persistent storage, then ignore this step but make sure you have an adequate backup solution for your data!
I will personally be using AWS EFS as they use replication across different AZs and it has automatic backups. You can however use whatever NFS solution you like but a backup solution for the NFS export is outside the scope of this article. Bare in mind Synology has been reported to not behave well with mailcow.
Make sure the following directories exist in your NFS export:
# NFS server and export:
fs-0642deb2359a4c8dd.efs.eu-west-1.amazonaws.com:/mx.96-fromsofia.net/
# Directories within export:
  -- backup/                        # Today's backup
  -- backup_old/            # Yesterday's backup
VM/OS
You need to use an OS that supports Docker and Docker compose. The list of supported OSs in the mailcow documentation is kinda sparse and if you have basic knowledge of your distribution you should be able to make it work.
I personally wanted to use RHEL9, however Docker is not supported for it. I decided not to use podman as one: podman is not docker; and two podman-compose is really not docker compose. Furthermore mailcow is supposed to run as root and the main advantage of podman over docker is the rootless pod.
For OS resources the documentation suggest at least 6GB of RAM which is a bit too much for most people that just want to host 5 to 10 mailboxes for themselves. You will see however many people on the internet, including myself who manage to run mailcow with 1GB RAM and about 6GB of SWAP.
Additionally ClamV and Solr should be disabled to further reduce the resource usage. I personally have also disabled Webmin as I access my mail from a mail client rather than a browser.
That being said my VM setup is as such:
- OS: Amazon Linux 2 (RPM based distro like CentOS)
- 1GB RAM
- 1vCPU
- 15GB local storage
Firewall
This tutorial will not include instructions for configuring a soft firewall as I am using security groups to control access to the mailcow VM. If you have an active soft firewall like iptables or firewalld you should ensure the necessary ports are open.
FirewallD allows you to add both ports and services pretty easily:
# firewall-cmd --add-service=ssh --permanent
# firewall-cmd --add-port=25/tcp --permanent
# firewall-cmd --reload
Step 1: Prepare the OS
Login to your server and escalate to root. Create the swapfile. Bare in mind the dd command may take a few minutes:
# touch /swapfile
# dd if=/dev/zero of=/swapfile bs=1M count=6000
Set the permission of the generated file and activate the swap space:
# chmod 600 /swapfile
# mkswap /swapfile
# swapon /swapfile
To make sure the swapfile is activated at boot run the following command:
# echo '/swapfile none swap defaults 0 0' >> /etc/fstab
Required packages:
- vim # Editor to edit files if you need to
- git # Git to clone the mailcow repository and docker/docker compose if building from source
- curl # Used to install docker compose and also useful to check your SSL certificate and website availability
- nfs-utils # NFS utilities, if you are planning to use NFS
- docker # The Docker engine, can install either from source of from your package manager if available
- docker-compose # Docker compose plugin, can install either from source of from your package manager if available
Amend the below commands to match those of your package manager, ex. aptitude, pacman, zypper, apt, etc. Update the OS:
# yum update -y
Install the required packages:
# yum install -y vim git curl nfs-utils docker
Set your timezone:
# timedatectl set-timezone Europe/Berlin
Start and enable the Docker engine:
# systemctl start docker
# systemctl enable docker
The docker-compose plugin doesn’t exist in the repositories for my distribution so I had to install it from source. If you have docker-compose in your distro’s repositories you can install it from there but make sure it’s version is 2.0 or higher:
# mkdir /root/.docker/cli-plugins -p
# curl -SL https://github.com/docker/compose/releases/download/v2.16.0/docker-compose-linux-x86_64 -o /root/.docker/cli-plugins/docker-compose
# chmod +x /root/.docker/cli-plugins/docker-compose
Verify docker compose is installed:
# docker compose version
Mount your nfs export. Please note you don’t have to use the exact same mount options as shown below. These are just the recommended one that AWS suggests for EFS:
# echo 'fs-0642deb2359a4c8dd.efs.eu-west-1.amazonaws.com:/mx.96-fromsofia.net/ /mnt nfs nfsvers=4.1,rsize=1048576,wsize=1048576,hard,timeo=600,retrans=2,noresvport 0 0' >> /etc/fstab
# mount /mnt/
Disable the local resolver listening on port 25. We don’t want that to interfere with the postfix-mailcow container:
# sed -i 's/^smtp      inet/#smtp      inet/g' /etc/postfix/master.cf
# systemctl reload postfix
Verify nothing is listening on the ports mailcow will use:
# ss -tlpn | grep -E -w '25|80|110|143|443|465|587|993|995|4190'
Set the umask to the restrictive value shown below:
# umask 0022
Step 2: Download and install mailcow
Download the mailcow project into /opt:
# cd /opt/
# git clone https://github.com/mailcow/mailcow-dockerized
Change to the cloned directory. Make sure you stay in this path so the following commands work:
# cd mailcow-dockerized/
Disabling IPv6 is considered bad internet practice and suggested against by the mailcow documentation. Disable this only if your VM really doesn’t support IPv6:
# sed -i 's/enable_ipv6: true/enable_ipv6: false/g' docker-compose.yml
# sed -i 's/do-ip6: yes/do-ip6: no/g' data/conf/unbound/unbound.conf
# echo -e 'smtp_address_preference = ipv4\ninet_protocols = ipv4' > data/conf/postfix/extra.cf
# sed -i '/::/d' data/conf/nginx/listen_*
# sed -i '/::/d' data/conf/nginx/templates/listen*
# sed -i '/::/d' data/conf/nginx/dynmaps.conf
# sed -i 's/,\[::\]//g' data/conf/dovecot/dovecot.conf
# sed -i 's/\[::\]://g' data/conf/phpfpm/php-fpm.d/pools.conf
Create a docker-compose override file:
# vim docker-compose.override.yml
Enter the following content:
version: '2.1'
services:                                                                   # Remove this line if you are using IPv6 !!!
  ipv6nat-mailcow:                                                          # Remove this line if you are using IPv6 !!!
    image: bash:latest                                                      # Remove this line if you are using IPv6 !!!
    restart: "no"                                                           # Remove this line if you are using IPv6 !!!
    entrypoint: ["echo", "ipv6nat disabled in compose.override.yml"]        # Remove this line if you are using IPv6 !!!
Generate the mailcow configuration. This is an interactive script that will take a few minutes.
When you run the script you will be asked to enter the hostname of the mail server. Enter the value of your MX record here.
So if your domain is example.com and it’s MX record points to mail.example.com, enter mail.example.com here.
Based on your VM’s resources you will also be able to choose if you want to disable ClamV and Solr or not.
You can also select the mailcow build to use, although the stable one is recommended for production.
# ./generate_config.sh
Once the config has been generated you can choose to disable Webmin or not. This gives you a UI interface (SoGO) that can be used by the email users to check their mail, send mail, etc.
I don’t need it so I am disabling it:
# sed -i 's/SKIP_SOGO=n/SKIP_SOGO=y/g' mailcow.conf
Step 3: Run the mailcow project
Pull the docker images and start the containers:
# docker compose pull
# docker compose up -d
Verify all the containers are running and none have Exited status:
# docker ps -a
If you have disabled IPv6, you can ignore the ipv6nat-mailcow container. The output should look similar to the below:
CONTAINER ID   IMAGE                    COMMAND                  CREATED          STATUS                      PORTS                                                                                                                                                                                                                               NAMES
bfa065ccca0a   bash:latest              "echo 'ipv6nat disab..."   48 seconds ago   Exited (0) 31 seconds ago                                                                                                                                                                                                                                       mailcowdockerized-ipv6nat-mailcow-1
23496fe0d57d   mailcow/rspamd:1.92      "/docker-entrypoint...."   48 seconds ago   Up 1 second                                                                                                                                                                                                                                                     mailcowdockerized-rspamd-mailcow-1
e2bf1f798d47   mailcow/netfilter:1.51   "python3 -u /server...."   48 seconds ago   Up 34 seconds                                                                                                                                                                                                                                                   mailcowdockerized-netfilter-mailcow-1
c12bba9a7df8   mcuadros/ofelia:latest   "/usr/bin/ofelia dae..."   48 seconds ago   Up 31 seconds                                                                                                                                                                                                                                                   mailcowdockerized-ofelia-mailcow-1
a0f76e6eeb9d   mailcow/acme:1.84        "/sbin/tini -g -- /s..."   48 seconds ago   Up 32 seconds                                                                                                                                                                                                                                                   mailcowdockerized-acme-mailcow-1
8b16bb2378ee   mailcow/postfix:1.68     "/docker-entrypoint...."   48 seconds ago   Up 35 seconds               0.0.0.0:25->25/tcp, :::25->25/tcp, 0.0.0.0:465->465/tcp, :::465->465/tcp, 0.0.0.0:587->587/tcp, :::587->587/tcp, 588/tcp                                                                                                            mailcowdockerized-postfix-mailcow-1
63ee728bab29   mailcow/dovecot:1.22     "/docker-entrypoint...."   48 seconds ago   Up 35 seconds               0.0.0.0:110->110/tcp, :::110->110/tcp, 0.0.0.0:143->143/tcp, :::143->143/tcp, 0.0.0.0:993->993/tcp, :::993->993/tcp, 0.0.0.0:995->995/tcp, :::995->995/tcp, 0.0.0.0:4190->4190/tcp, :::4190->4190/tcp, 127.0.0.1:19991->12345/tcp   mailcowdockerized-dovecot-mailcow-1
3de00c719c78   nginx:mainline-alpine    "/docker-entrypoint...."   48 seconds ago   Up 35 seconds               0.0.0.0:80->80/tcp, :::80->80/tcp, 0.0.0.0:443->443/tcp, :::443->443/tcp                                                                                                                                                            mailcowdockerized-nginx-mailcow-1
09b35b5a1f96   mariadb:10.5             "docker-entrypoint.s..."   48 seconds ago   Up 39 seconds               127.0.0.1:13306->3306/tcp                                                                                                                                                                                                           mailcowdockerized-mysql-mailcow-1
d99e7c3eff59   mailcow/clamd:1.61       "/sbin/tini -g -- /c..."   48 seconds ago   Up 39 seconds (healthy)     3310/tcp, 7357/tcp                                                                                                                                                                                                                  mailcowdockerized-clamd-mailcow-1
869db7e39c4a   mailcow/phpfpm:1.82      "/docker-entrypoint...."   48 seconds ago   Up 39 seconds               9000/tcp                                                                                                                                                                                                                            mailcowdockerized-php-fpm-mailcow-1
cdf17bd6b8c2   mailcow/unbound:1.17     "/docker-entrypoint...."   48 seconds ago   Up 42 seconds               53/tcp, 53/udp                                                                                                                                                                                                                      mailcowdockerized-unbound-mailcow-1
f94dd8e7a6e0   memcached:alpine         "docker-entrypoint.s..."   48 seconds ago   Up 41 seconds               11211/tcp                                                                                                                                                                                                                           mailcowdockerized-memcached-mailcow-1
1dd99d6cb74e   mailcow/dockerapi:2.01   "/bin/sh /app/docker..."   48 seconds ago   Up 44 seconds                                                                                                                                                                                                                                                   mailcowdockerized-dockerapi-mailcow-1
fc729b014e23   mailcow/olefy:1.11       "python3 -u /app/ole..."   48 seconds ago   Up 45 seconds                                                                                                                                                                                                                                                   mailcowdockerized-olefy-mailcow-1
fb6fdd450e3f   mailcow/solr:1.8.1       "docker-entrypoint.s..."   48 seconds ago   Up 41 seconds               127.0.0.1:18983->8983/tcp                                                                                                                                                                                                           mailcowdockerized-solr-mailcow-1
98a97e93d6d5   mailcow/sogo:1.115       "/docker-entrypoint...."   48 seconds ago   Up 42 seconds                                                                                                                                                                                                                                                   mailcowdockerized-sogo-mailcow-1
c4a999124e2a   redis:7-alpine           "docker-entrypoint.s..."   48 seconds ago   Up 41 seconds               127.0.0.1:7654->6379/tcp                                                                                                                                                                                                            mailcowdockerized-redis-mailcow-1
b2dbc6a858ff   mailcow/watchdog:1.97    "/bin/sh -c /watchdo..."   48 seconds ago   Up 41 seconds                                                                                                                                                                                                                                                   mailcowdockerized-watchdog-mailcow-1
The below commands can be ran on your personal computer or any from the mailcow server computer.
Check if HTTP is returning 200
$ curl -ILs http://mx.96-fromsofia.net
Check if HTTPS is returning 200
$ curl -ILks https://mx.96-fromsofia.net
You will see a lot of output but are generally expecting to see a line containing HTTP/2 200.
If the code is something like 4XX or 5XX then that’s not good. If you are using a proxy or redirection you may see a 3XX code, but that should be followed by a 200 code.
Check if the SSL is working:
$ curl -Iv https://mx.96-fromsofia.net 2>&1
If you see lines similar to the below that contain words such as unknown or fail or error that means you have a problem with the SSL.
* TLSv1.3 (OUT), TLS alert, unknown CA (560):
* SSL certificate problem: self signed certificate
* Closing connection 0
curl: (60) SSL certificate problem: self signed certificate
This sometimes happens but it usually is a pretty simple fix and all it takes is restarting the acme-mailcow container.
# docker compose restart acme-mailcow
To monitor the process of obtaining the new certificate:
# docker compose logs --tail 200 -f acme-mailcow
Assuming the action was successful you should see a similar output:
Assuming the action was successful you should see a similar output:
mailcowdockerized-acme-mailcow-1  | Tue Feb 21 19:17:12 UTC 2023 - Initializing, please wait...
mailcowdockerized-acme-mailcow-1  | Tue Feb 21 19:17:13 UTC 2023 - Using existing domain rsa key /var/lib/acme/acme/key.pem
mailcowdockerized-acme-mailcow-1  | Tue Feb 21 19:17:13 UTC 2023 - Using existing Lets Encrypt account key /var/lib/acme/acme/account.pem
mailcowdockerized-acme-mailcow-1  | Tue Feb 21 19:17:13 UTC 2023 - Detecting IP addresses...
mailcowdockerized-acme-mailcow-1  | Tue Feb 21 19:17:33 UTC 2023 - OK: 54.78.179.50, 0000:0000:0000:0000:0000:0000:0000:0000
mailcowdockerized-acme-mailcow-1  | Tue Feb 21 19:17:36 UTC 2023 - Found A record for mx.96-fromsofia.net: 54.78.179.50
mailcowdockerized-acme-mailcow-1  | Tue Feb 21 19:17:36 UTC 2023 - Confirmed A record 54.78.179.50
mailcowdockerized-acme-mailcow-1  | Tue Feb 21 19:17:36 UTC 2023 - Certificate /var/lib/acme/mx.96-fromsofia.net/cert.pem missing or changed domains 'mx.96-fromsofia.net' - start obtaining
mailcowdockerized-acme-mailcow-1  | Tue Feb 21 19:17:36 UTC 2023 - Checking resolver...
mailcowdockerized-acme-mailcow-1  | Tue Feb 21 19:17:36 UTC 2023 - Resolver OK
mailcowdockerized-acme-mailcow-1  | Tue Feb 21 19:17:36 UTC 2023 - Using command acme-tiny   --account-key /var/lib/acme/acme/account.pem --disable-check --csr /var/lib/acme/mx.96-fromsofia.net/acme.csr --acme-dir /var/www/acme/
mailcowdockerized-acme-mailcow-1  | Parsing account key...
mailcowdockerized-acme-mailcow-1  | Parsing CSR...
mailcowdockerized-acme-mailcow-1  | Found domains: mx.96-fromsofia.net
mailcowdockerized-acme-mailcow-1  | Getting directory...
mailcowdockerized-acme-mailcow-1  | Directory found!
mailcowdockerized-acme-mailcow-1  | Registering account...
mailcowdockerized-acme-mailcow-1  | Registered! Account ID: https://acme-v02.api.letsencrypt.org/acme/acct/976109636
mailcowdockerized-acme-mailcow-1  | Creating new order...
mailcowdockerized-acme-mailcow-1  | Order created!
mailcowdockerized-acme-mailcow-1  | Verifying mx.96-fromsofia.net...
mailcowdockerized-acme-mailcow-1  | mx.96-fromsofia.net verified!
mailcowdockerized-acme-mailcow-1  | Signing certificate...
mailcowdockerized-acme-mailcow-1  | Certificate signed!
mailcowdockerized-acme-mailcow-1  | Tue Feb 21 19:17:45 UTC 2023 - Deploying certificate /var/lib/acme/mx.96-fromsofia.net/cert.pem...
mailcowdockerized-acme-mailcow-1  | Tue Feb 21 19:17:45 UTC 2023 - Verified hashes.
mailcowdockerized-acme-mailcow-1  | Tue Feb 21 19:17:45 UTC 2023 - Certificate successfully obtained
mailcowdockerized-acme-mailcow-1  | Tue Feb 21 19:17:45 UTC 2023 - Reloading or restarting services... (1)
mailcowdockerized-acme-mailcow-1  | Restarting 3de00c719c78a352041ae3ae02947e99697aa40e384f9393a07c32547e4dca11...
mailcowdockerized-acme-mailcow-1  | command completed successfully
mailcowdockerized-acme-mailcow-1  | Restarting 63ee728bab29879704c88df00f6122915791e3dc423228573d6f05a99c768ea5...
mailcowdockerized-acme-mailcow-1  | command completed successfully
mailcowdockerized-acme-mailcow-1  | Restarting 8b16bb2378eeb68b0001e552674f19467478d4120254993c7ee639534747f194...
mailcowdockerized-acme-mailcow-1  | command completed successfully
mailcowdockerized-acme-mailcow-1  | Tue Feb 21 19:17:56 UTC 2023 - Waiting for containers to settle...
mailcowdockerized-acme-mailcow-1  | Tue Feb 21 19:18:06 UTC 2023 - Certificates successfully requested and renewed where required, sleeping one day
Now if you run the same curl -Iv command against your website you should see no errors/problems and something similar to the below:
* SSL connection using TLSv1.3 / TLS_AES_256_GCM_SHA384
* ALPN, server accepted to use h2
* Server certificate:
*  subject: CN=mx.96-fromsofia.net
*  start date: Feb 21 18:17:42 2023 GMT
*  expire date: May 22 18:17:41 2023 GMT
*  subjectAltName: host "mx.96-fromsofia.net" matched cert's "mx.96-fromsofia.net"
*  issuer: C=US; O=Let's Encrypt; CN=R3
*  SSL certificate verify ok.
Step 4: Set up the mailcow environment
Open up a web browser and go to the hostname you choose for mailcow. In my case this is mx.96-fromsofia.net
Use the following credentials to login:
- User: admin
- Pass: moohoo
Under the System drop-down menu select Configuration:
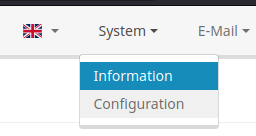
You can choose to change the password for the admin user, however I use a different approach.
I don’t like usernames such as admin, root, etc. especially on web interfaces. That being said I create a new admin user with a random username and a password of my choice.
Click on Add administrator:

You should now see the new user:

Log out and then log back in again with the user you just created.
Head back over to the section with the administrator users and delete the admin user:
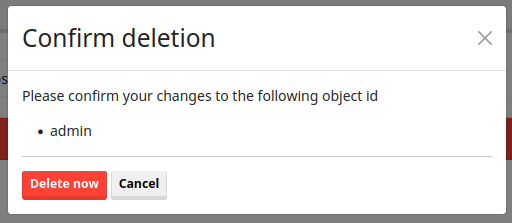
Step 5: Configure the mail server
From the Email drop-down menu select the Configure option:
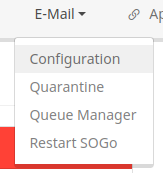
Under Domains choose to add a domain.
Here you want to choose the actual domain name rather than the sub domain used for mailcow. That being said if your mailcow server is mail.example.com you want to enter example.com here. For me this will be 96-fromsofia.net.
Adjust the maximum number of allowed aliases and mailboxes you want to allow for this domain. Also specify the allowed size for individual mailboxes and the whole domain quota.
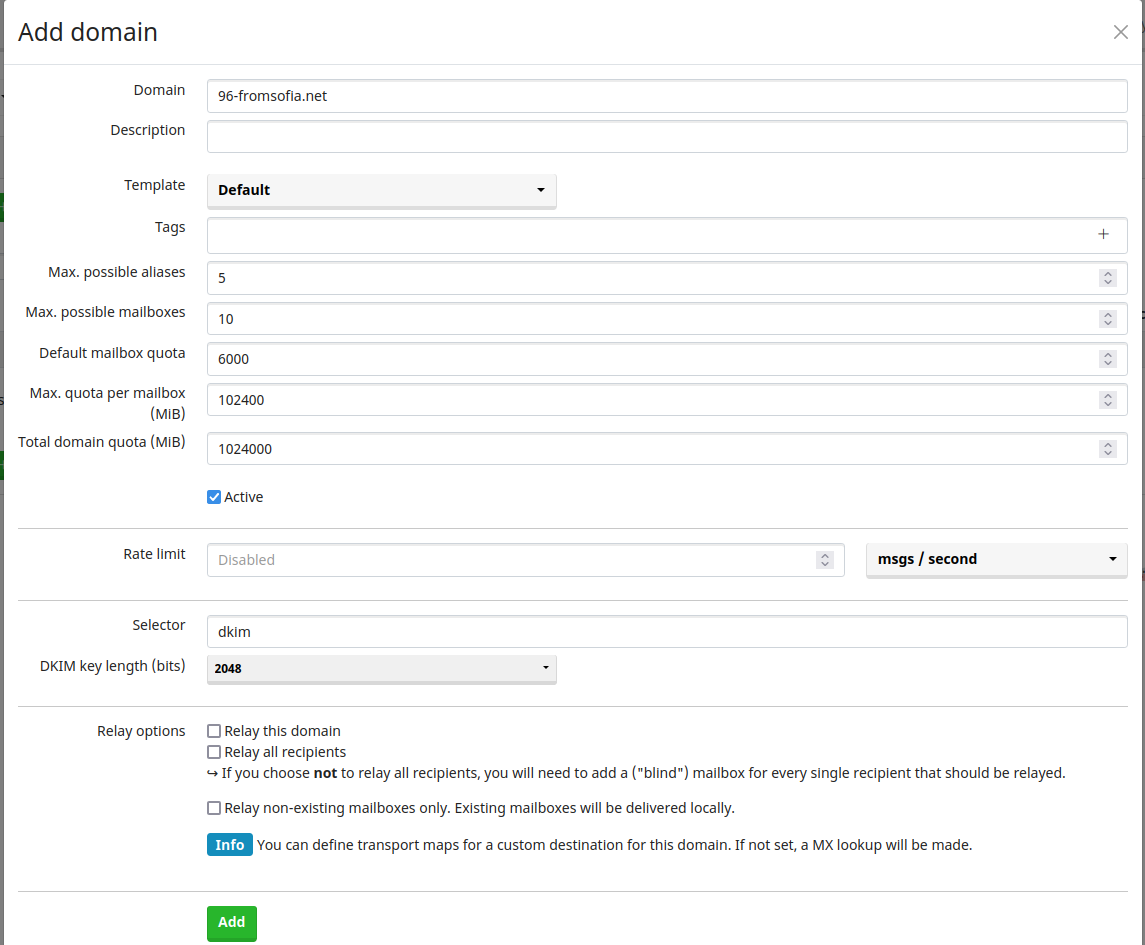
Go back to the System drop-down –> Configuration menu.
Under Options select ARC/DKIM keys:
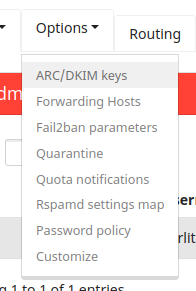
You will see the DKIM record generated for your mailcow domain:

Create this record in your DNS zone. It should look something like that:
DOMAIN                              TYPE    VALUE
---------------------------------------------------------------------------
dkim._domainkey.example.com.        TXT     "v=DKIM1;k=rsa;t=s;s=email;p=<LONG_KEY>"
---------------------------------------------------------------------------
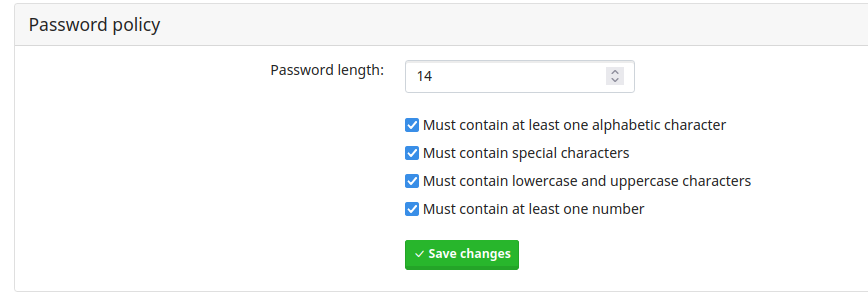
Again from the Options drop-down menu, select the Password policy option and amend the defaults as required.
Step 6: Mailboxes and aliases
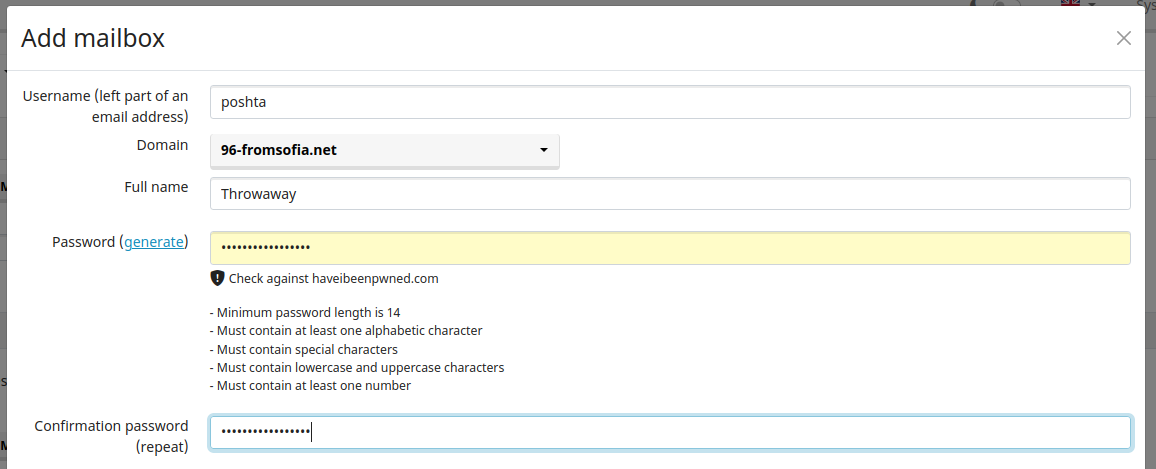
Go back to the Email drop-down –> Configuration menu. Select Mailboxes from the banner at the top and choose the option to add a mailbox.
Fill in the details according to your needs.
It is highly recommended you also enforce both incoming and outgoing TLS encryption:

The created mailbox should look similar to the below:

If you want to create an alias select Aliases from the banner at the top. Click on Add alias:

You can specify a single or multiple aliases base on what limit you choose earlier. Multiple aliases should be separated with a comma ‘,’ or ‘@’ can be used for a catchall expression:
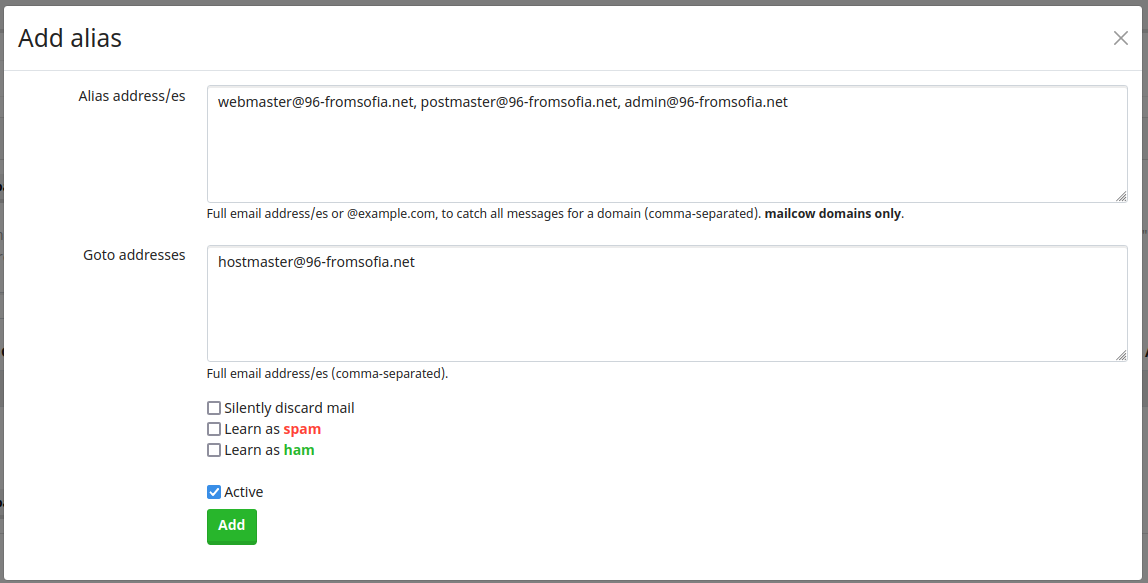
The configured aliases now appear in the interface and mail sent to them will be directed to the specified mailbox:

Step 7: Migrate your existing mail.
Go over to the Sync Jobs tab at the top and create a Sync Job.
Fill in the fields as follows:
- Username This is the mailbox you just created in mailcow you want to migrate into
- Host This is the value of the MX record for your old server
- Port Port used, IMAP (143) or IMAPS (993)
- Username Old username in the format of username@domain.com
- Password Password for the old username
- Encryption Method SSL for 993 is preferred
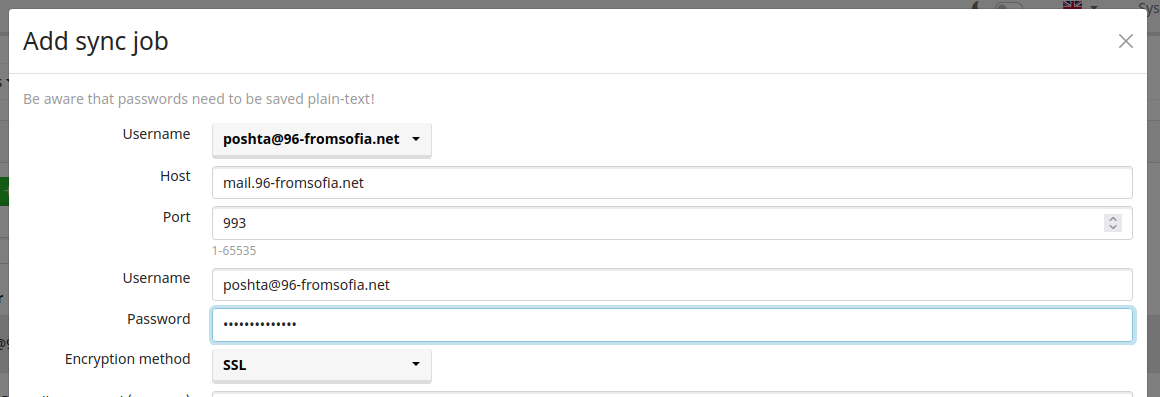
By default the sync job is active so as soon as you save it, the migration will begin. It will appear in Waiting state for a while:

Once it has completed under ‘Last run result’ you should see Success:

If you now return to the mailbox section, you should see the number of emails for the given username has increased:

Step 8: Create a backup script and a Docker compose systemd service
Create the following file in the cron.daily directory:
# vim /etc/cron.daily/backup-mailcow
Paste in the below script:
#!/bin/bash
# Remove oldest backup
rm -rf /mnt/backup_old/*
Make yesterday's backup the oldest backup
mv /mnt/backup/* /mnt/backup_old/
sync
# Create today's backup
cd /opt/mailcow-dockerized
MAILCOW_BACKUP_LOCATION=/mnt/backup /opt/mailcow-dockerized/helper-scripts/backup_and_restore.sh backup all
exit 0
This script will run daily and create a new backup of all mailcow components including your mailboxes. Two backups will be stored by default within the following local directories (these should be your actual NFS shares):
- /mnt/backup - today’s backup
- /mnt/backup_old - yesterday’s backup
Make the script executable and test it:
# chmod 700 /etc/cron.daily/backup-mailcow
# bash /etc/cron.daily/backup-mailcow
The beginning and ending of the output should look something similar to the below:
Using 1 Thread(s) for this run.
Notice: You can set the Thread count with the THREADS Variable before you run this script.
Using /mnt/backup as backup/restore location.

Found project name mailcowdockerized
/crypt/
/crypt/ecprivkey.pem
/crypt/ecpubkey.pem
OK
/redis/
/redis/dump.rdb
...
/backup_mariadb/backup-my.cnf
/backup_mariadb/xtrabackup_info
Verify the backup has been created:
# ls -l /mnt/backup/
By default if we reboot the server mailcow won’t be started when the OS boots back up. We can use systemd to ensure we start our mailcow project upon system boot.
Create a systemd service called mailcow:
# vim /etc/systemd/system/mailcow.service
Paste the following into the service file:
[Unit]
Description=Docker Compose Application Service
Requires=docker.service
After=docker.service

[Service]
Type=oneshot
RemainAfterExit=yes
WorkingDirectory=/opt/mailcow-dockerized
ExecStart=/bin/docker compose up -d
ExecStop=/bin/docker compose down
TimeoutStartSec=0

[Install]
WantedBy=multi-user.target
Enable the service:
# systemctl enable mailcow.service
Done! If you now reboot the server you should see that the docker compose project will be started as well after the Docker engine has been brought up.
Bonus Step: High availability (AWS specific)
This is an additional step you can choose to follow. The idea is to achieve somewhat of high availability by using an AWS auto scaling group.
We will rely on the backup that was just created in /mnt/backup and our ASG will use this backup and the NFS virtual mailboxes to restore our server in the event of server failure.
Bare in mind this will restore only the mail server related data - mysql, postfix config, mailboxes, etc. Settings like DKIM, password policy will have to be created again after the restore.
Create an IAM role for EC2 with the below permission policy:
{
    "Version": "2012-10-17",
    "Statement": [
        {
            "Sid": "EC2AssociateEIP",
            "Effect": "Allow",
            "Action": "ec2:AssociateAddress",
            "Resource": [
                "arn:aws:ec2:*:603404711025:elastic-ip/eipalloc-04eb6152921a6f523",
                "arn:aws:ec2:*:603404711025:instance/*"
            ]
        }
    ]
}
Create a launch template with the following options:
- Security Group with all ports for mailcow and SSH
- Keypair
- Dont include subnet in launch template
- Auto assign public IP - enable
- Storage 20GB # Heavily depends on mailox usage adjust accordingly!!
- IAM instance profile - IAM role
- Metadataaccessible - enabled
- Userdata - get the start-up script here
Create an ASG
- Choose the launch template you just created
- Select your VPC and subnets which need to be public!
- Desired, Min, Max capacities to 1
From the launched instance you can monitor the startup script output for errors:
# tail -f /var/log/cloud-init-output.log
The output at the end of the script should be similar to this:
 Container mailcowdockerized-ipv6nat-mailcow-1  Starting
 Container mailcowdockerized-ipv6nat-mailcow-1  Started
ae2595fc53a2
the input device is not a TTY
ae2595fc53a2

Starting watchdog-mailcow...
49af26879b2b
 Container mailcowdockerized-acme-mailcow-1  Restarting
 Container mailcowdockerized-acme-mailcow-1  Started
SSL is valid
SSL is valid
Created symlink from /etc/systemd/system/multi-user.target.wants/mailcow.service to /etc/systemd/system/mailcow.service.
Cloud-init v. 19.3-46.amzn2 finished at Thu, 23 Feb 2023 17:20:32 +0000. Datasource DataSourceEc2.  Up 633.71 seconds
The End
Congratulations! By now you should have successfully moved your legacy email solution to mailcow. Your mailboxes should be created and you should be able to send and receive mail.
If you have used the backup and NFS approach then this also adds fault tolerance to your application. Finally for those that chose to follow the Bonus Step they should also achieve some high availability in the case of hardware failures.
If you’ve enjoyed this, make sure to go ahead and look at the Articles section. My personal projects you can find on my git server. If you have a question or want to get in touch, feel free to email me.
Thank you for reading and have a good night!