Migrate an existing domain to AWS Route53
Overview
In this article I’ll go through the process of migrating or transferring an existing domain from a registrar and importing it into AWS. At the end I will also re-create my existing DNS records for the transferred domain into a new AWS hosted zone.
IMPORTANT - Here you will see me using an email that is hosted on a subdomain of the domain I am transferring. You shouldn’t do this as you will be unable to verify the transfer and may lose access to your email account. Please use an email hosted outside the domain you are transferring so you don’t get unnecessary headaches.
Before all, let’s cover what exactly Route53 offers and how we can use it’s features to setup our domain and DNS records. In this article you will see me working with two parts of Route53, one will be the registered domain and the other will be the hosted zone associated with this domain. The registered domain is just that - it contains information about the entity that registered. Additionally it’s also where you configure the nameservers obtained from the company hosting your DNS records.
The second part is the hosted zone. This is where you define your DNS records like A, CNAME, MX, etc. As this is a part of AWS it also allows you to use Aliases which in a sense is similiar to a CNAME record but can point to AWS services only. It’s also the preferred way over CNAME records when referring to AWS services. The hosted zone will automatically provide an NS records with a set of nameservers to associate your registered domain with.
My domain is currently registered with Namecheap, however my DNS records are hosted with Linode.
I’ve decided I will first start the transfer process of the domain over to AWS from Namecheap.
Once the domain has been transferred successfully over to AWS I will recreate the DNS records I have in Linode in a newly Route53 hosted zone.
Transferring a domain name from one registrar to another is a right the domain owner has and can exercise according to ICANN.
Step 1 - Unlocking your existing domain (Namecheap specific)
I am not entirely sure this option exists for all registrars or not but in my case I have to unlock my domain before I can transfer it. This is done from the Namecheap portal as described in the steps below. If you are using a different registrar you may have to do validate the transfer in another way such as email, sms or DNS verification.
Go to your Namecheap portal, after logging in locate your domain from the landing page and click on Manage:

Click on Transfer and Sharing from the panel menu:

Scroll down to the bottom to the section titled Transfer Out and click on UNLOCK:

After you’ve successfully unlocked your domain a message will be displayed. You can now click on the AUTH CODE button to request your authorization code:

You will now have to check the email your domain was registered with and note down the authorization code received from Namecheap. Have this available as you will need it shortly.
Step 2 - Transferring your domain into Route53
After logging into the AWS account you wish to transfer the domain to, go to the Route53 console. Under the Register Domain section you should see a transfer your existing domain option. Click on it:

Enter the domain name you unlocked in Step 1. Click CHECK:
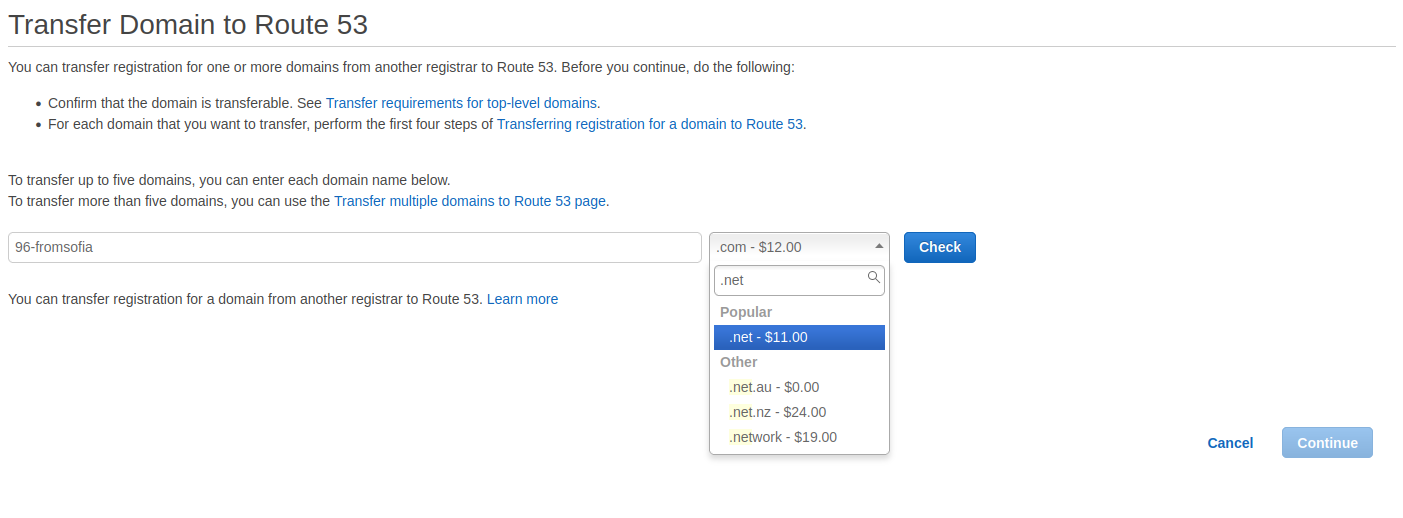
After a successful check you will be able to re-purchase this domain by selecting Add to card. Click on Continue:

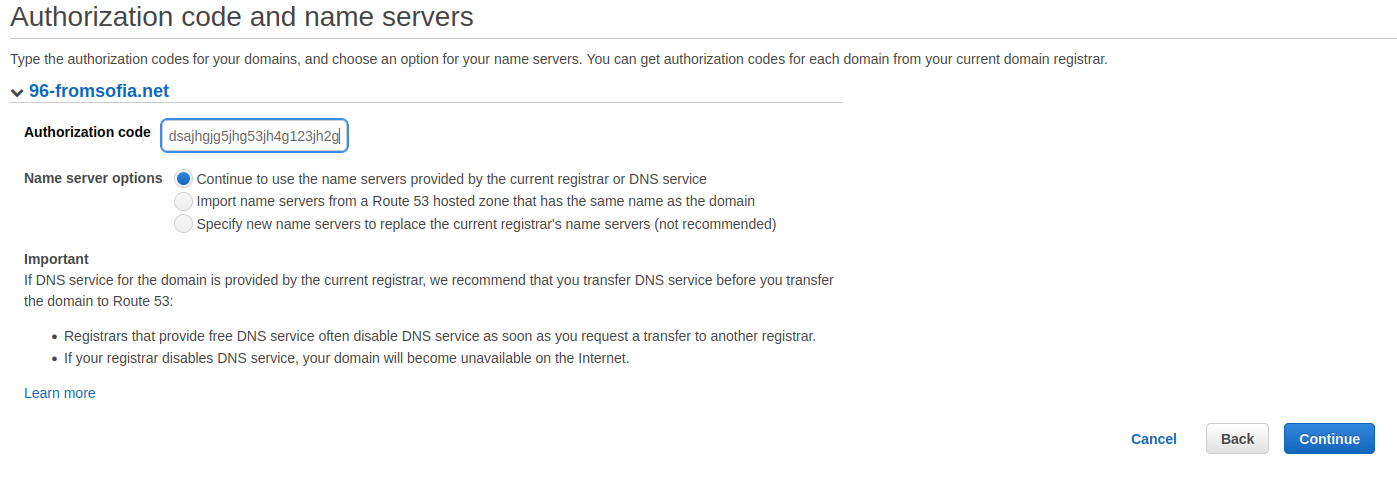
On the next screen enter the authorization code you just received from your soon to be former (still current) registrar. You can choose to keep the existing nameservers for the domain, configure new ones or point to a Route53 hosted zone. I will use the default option and choose to keep my existing nameservers for the time being. I will be creating a new Route53 hosted zone later in this article. Once you have filled in the details choose Continue to proceed:
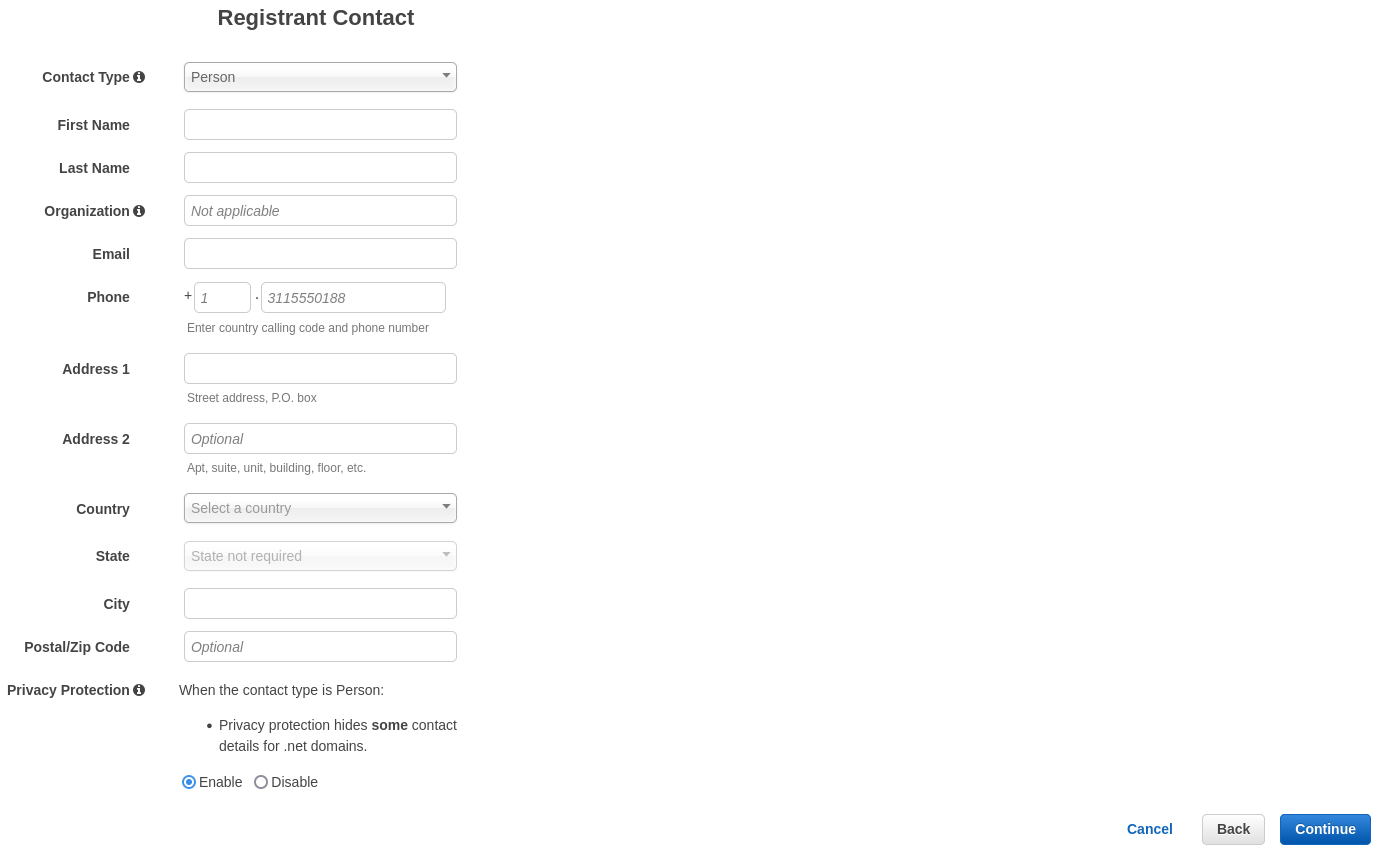
On the next screen you will have to provide personal information about the entity registering the domain as you would usually do with any registrar. Fill in the relevant information and select Continue:
Finally review your details, confirm if you want automatic renewal or not, accept the terms and conditions and click on Complete Order:

If all provided information is correct, you should see a message stating your order has been successful.
NOTE!: It is important to monitor the email you used to register this domain and the one it used to be registered with before. This is required because AWS (and potentially your old registrar) will send you emails to verify the transfer. As stated in the Route53 console this can be a single email or 3 emails that AWS may send you.
After you have confirmed the transfer AWS claims your domain will be migrated to Route53 within 11 days. In my case I almost immediately received an email from Namecheap to confirm the transfer and then an email from AWS to validate the new registrar with ICANN. The whole process was completed in about an hour or so.
Once the transfer process has been completed, you have actioned all emails sent to you by your old registrar and AWS and you can see your domain in Route53 under Registered Domains, proceed with the next step.
Step 3 - Gather DNS records from current hosting provider
First off you will need to go to wherever your current DNS records are hosted and note them down for reference. This will be needed when you are adding the records in your new Route53 hosted zone. In my case my the DNS records were hosted with Linode, so I had to go to their console and gather the required information from there.
However as different people will use different hosting companies to host their DNS records, I would like to show you a way you can gather this information from a terminal assuming you know what record types and subdomains exist for your domain.
This can be done with the dig utility.
Dig uses the following syntax: dig <record type> <optional arguments> <hostname>.
If you have different subdomains and additional DNS records configured, make sure to amend the <record type> and <hostname> values accordingly.
The following example shows the commands I ran to get the values of all my DNS records for each subdomain I have configured:
$ for record in ns soa a cname mx txt srv caa ; do dig $record +short 96-fromsofia.net ; done
ns3.linode.com.
ns1.linode.com.
ns5.linode.com.
ns2.linode.com.
ns4.linode.com.
ns1.linode.com. sysad.96-fromsofia.net. 2021000073 14400 14400 1209600 86400
212.71.252.132
0 mail.96-fromsofia.net.
"v=spf1 a:mail.96-fromsofia.net ?all"
$

$ dig a +short git.96-fromsofia.net
161.35.69.213
$

$ dig a +short mail.96-fromsofia.net
199.247.26.236
$

$ dig cname +short imap.96-fromsofia.net
mail.96-fromsofia.net.
$

$ dig cname +short smtp.96-fromsofia.net
mail.96-fromsofia.net.
$

$ dig txt +short 2021-aug._domainkey.96-fromsofia.net
"v=DKIM1; k=rsa; p=<LONG DKIM STRING>"
$

$ dig txt +short _dmarc.96-fromsofia.net
"v=DMARC1; p=reject;"
$
Step 4 - Create your new Hosted zone in AWS Route53
Now navigate to the Route53 console in your AWS account, locate the section that says Hosted zones and click on Create hosted zone:

Under Domain name fill in the domain name you have been working with so far. Make sure Public hosted zone is selected. You are not required to add a description or any tags but can do so if you wish. Press Create hosted zone:
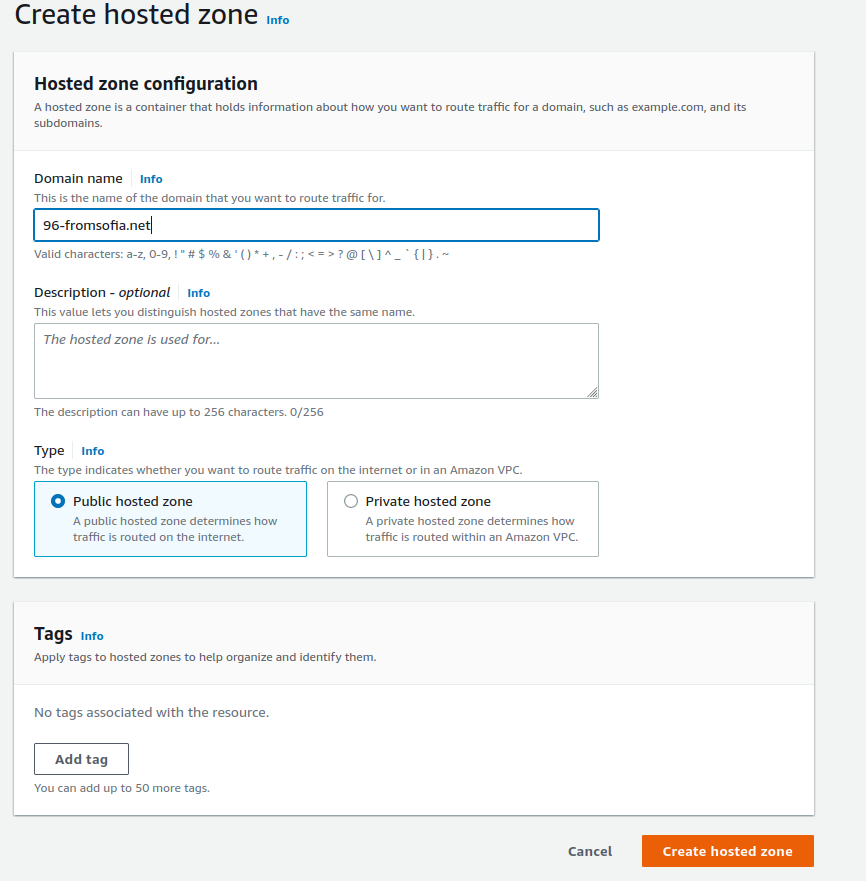
Once your zone has been created click on it and you will see the Records section where you can view and configure your DNS records. If you have been following this article so far, then you should have your old domain name already registered with AWS. The nameservers which determine where your DNS records are hosted should still be pointing to your old hosting provider. That being said before adding any records in this newly created Route53 hosted zone, you need to update the nameservers for your domain.
Luckily AWS makes this easy enough and once your hosted zone has been created, Route53 automatically provides you with 2 DNS records. An NS records and a SOA record. Note down the values of the NS record that was created as these are your new nameservers:

Step 5 - Update your domain name with the Route53 nameservers.
On the left hand navigation menu in Route53, under the Domains section click on Registered domains:
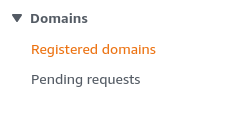
Locate your domain name and click on it. You will see a screen with some personal and contact information about yourself or the entity that has registered this domain. More importantly this is also where you point your domain to particular nameservers so it can be managed by a certain DNS provider, in our case Route53.
This is done from the Name servers section, click on Add or edit name servers:
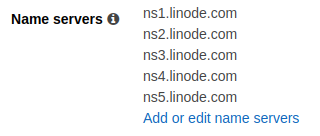
Next you will need to fill in the values you found in the Route53 console for the generated NS record. Each hostname needs to be entered in it’s own input field and you should also remove the ‘.’ (dot) at the end. It should look something like the below screenshot, but with the nameservers from your NS record.
Once done, click on Update:
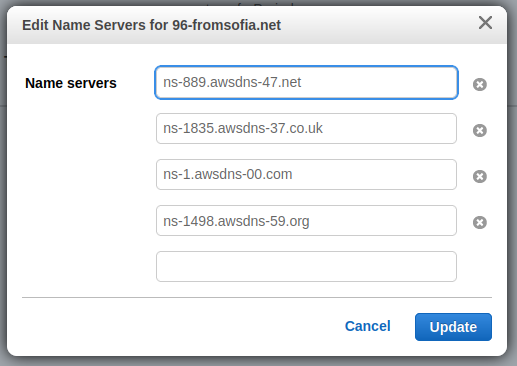
This may take a few minutes but shortly these changes will take effect. You can use a combination of the watch and dig commands to monitor this as such:
$ watch -n 30 "dig ns +short 96-fromsofia.net | grep awsdns"
Every 30.0s: dig ns +short 96-fromsofia.net | grep awsdns
This will be refreshing the output of the dig command every 30 seconds, initially you will see no output but eventually something similar will show up:
Every 30.0s: dig ns +short 96-fromsofia.net | grep awsdns

ns-1835.awsdns-37.co.uk.
ns-889.awsdns-47.net.
ns-1498.awsdns-59.org.
ns-1.awsdns-00.com.
That means the change has taken effect. If after 5-10 minutes you are still seeing your old nameservers, then you may need to clean your browser, OS or router DNS cache. I had to do this on my router as I had a bad cache.
Alternatively you can use an online DNS record lookup to verify if the change has been successful.
Step 6 - Create your DNS records in the new hosted zone
I will not go into too much detail in regards to creating the DNS records as if you are migrating an existing domain name you have probably created DNS records before and more importantly the DNS records I am creating will not be necessarily relevant to you.
The process is as follows:
- Go to the hosted zone you just created and click on it
- From the Records view click on Create record
- If you are not too familiar with AWS I would suggest clicking on Switch to wizard and choosing Simple Routing
- After proceeding, from the next screen click on Define simple record
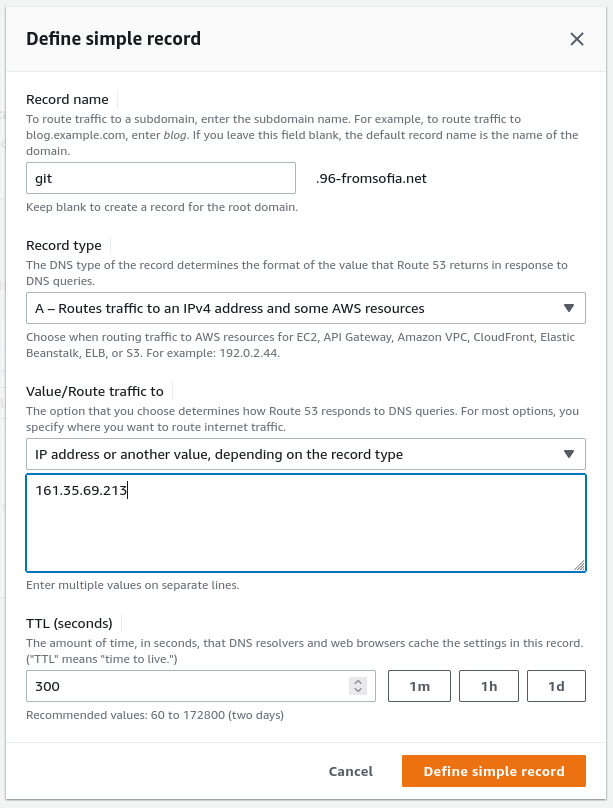
- You would then fill in the hostname, define the record type and select what it should point to
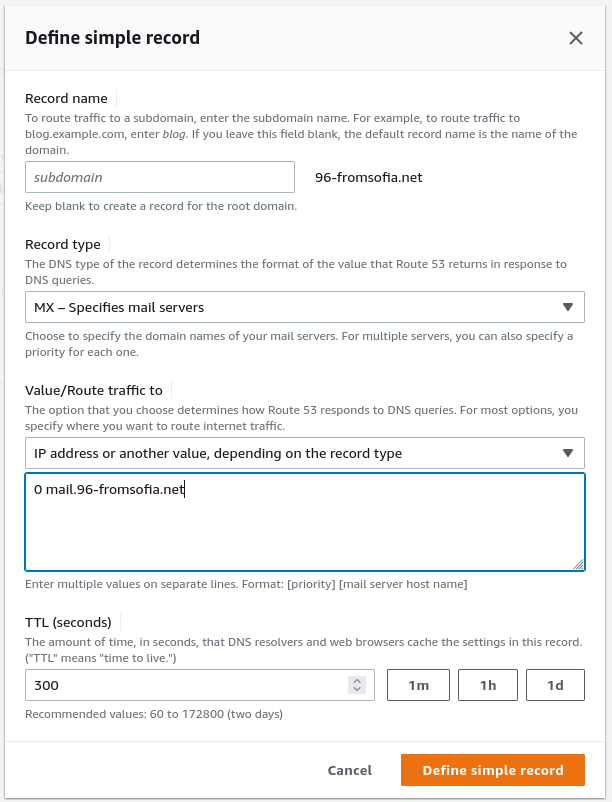
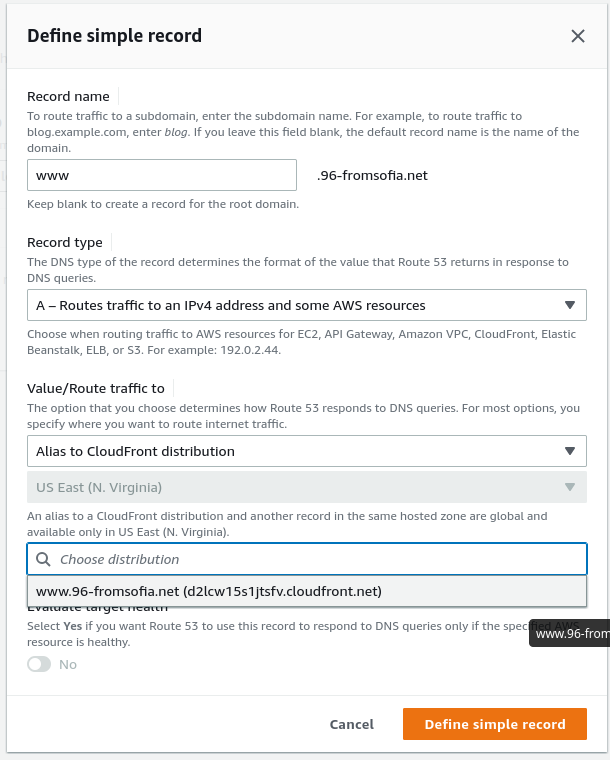
Below I’ve provided a few screenshots for defining some common types of DNS records, however I would first like to make a note about DKIM domain keys. I had some trouble adding a TXT record for a DKIM domain key as AWS kept on complaining the value provided is too long. The problem seems to be due to how the AWS console parses this value, so you need to use quotation to break your string into smaller ones.
This stackoverflow post solved my issue. My suggestion is to copy the correctly formatted TXT record from the answer in this post and paste it to a text editor. Then copy and paste your TXT record in the text editor on a new line and place quotations as the example in the stackoverflow answer. Make sure the positioning of the quotes in your TXT record matches their positioning from the stackoverflow example and save your record.
A Record
CNAME Record
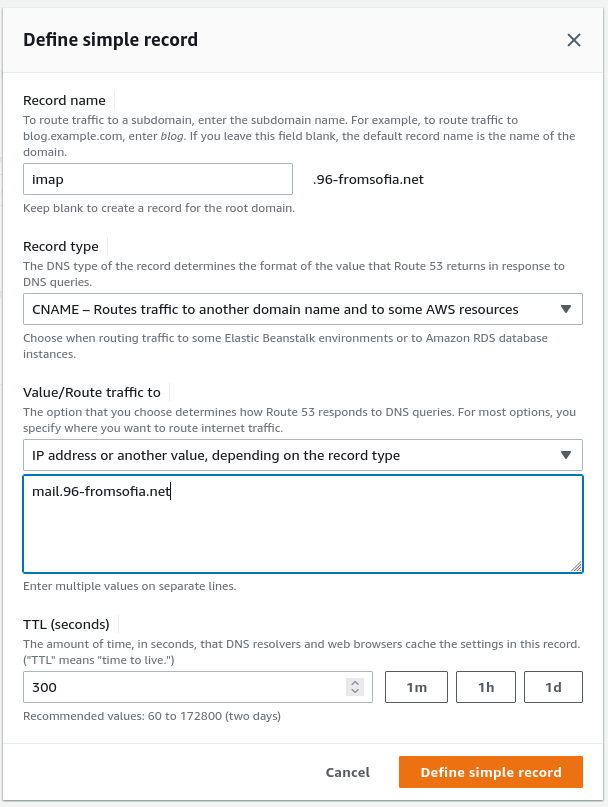
MX Record
Alias Record (like CNAME but AWS-specific)
Bonus step - Adding SSL
In addition to the DNS services AWS provides with Route53, AWS is also a CA which can generate and sign SSL/TLS certificates for you. If you want to generate an SSL certificate for your domain to use within AWS, you can do so from the ACM (AWS Certificate Manager) service.
- In the AWS console from the search box look for ACM and click on Certificate Manager
- Make sure you are in the N. Virginia region regardless of which region you will want to use your certificate in
- Click on Request certificate
- Choose Request a public certificate and click on Next
- Fill in the domain name you want to protect. You can enter a domain, add subdomains or use *.exmaple.com for a wildcard certificate
- The defaults should work perfectly for this guide, unless you want to do something specific, simply click Request to proceed
Your request has now been submitted. If you selected DNS validation, you will be provided with a list of CNAME records:

You will need to create these CNAME records in your hosted zone for the relevant domain. Once done allow a few minutes and verify if your domain has been successfully validated.

You can now use this certificate in your AWS environment.
Final step - Verify your DNS records are working as expected
Similarly to before I will use the dig commands I did in step 3. If you have re-created the exactly same DNS records in your Route53 hosted zone that existed with your old hosting provider the only difference in the output of the commands from earlier will be the nameservers. These should now point to the new ones provided by AWS.
In my particular case I also moved my website to an S3 bucket behind a Cloudfront distribution so for me the A records for 96-fromsofia.net are now also different. Everything else is the same as before and is properly resolving.
$ for record in ns soa a cname mx txt srv caa ; do dig $record +short 96-fromsofia.net ; done
ns-1.awsdns-00.com.
ns-889.awsdns-47.net.
ns-1498.awsdns-59.org.
ns-1835.awsdns-37.co.uk.
ns-889.awsdns-47.net. awsdns-hostmaster.amazon.com. 1 7200 900 1209600 86400
13.224.222.106
13.224.222.72
13.224.222.89
13.224.222.18
0 mail.96-fromsofia.net.
"v=spf1 a:mail.96-fromsofia.net ?all"
$

$ dig a +short git.96-fromsofia.net
161.35.69.213
$

$ dig a +short mail.96-fromsofia.net
199.247.26.236
$

$ dig cname +short imap.96-fromsofia.net
mail.96-fromsofia.net.
$

$ dig cname +short smtp.96-fromsofia.net
mail.96-fromsofia.net.
$

$ dig txt +short 2021-aug._domainkey.96-fromsofia.net
"v=DKIM1; k=rsa; p=<LONG DKIM STRING>"
$

$ dig txt +short _dmarc.96-fromsofia.net
"v=DMARC1; p=reject;"
$
The End
If you’ve made it so far congratulations! You should have now successfully moved your domain name and DNS records to AWS making it easier to integrate with the rest of your applications running on AWS.
If you’ve enjoyed this, make sure to go ahead and look at the Articles section. My personal projects you can find on my git server. If you have a question or want to get in touch, feel free to email me.
Thank you for reading and have a good night!